Toyota Tundra Tailgate Seal
Tailgate Seals & Other Mythical Creatures
You are Here: Tailgate Seals & Other Mythical Creatures

Eat My Dust
Do Tailgate Seals Really Seal?
Well – yes. And no. It’s a start, but like so many other things, the more you work at it, the better the end result will be.
Toyota Tundra Tailgate Seal:
Fortunately for Tundra owners, the water and dust factories known as Tacoma Bed Storage Boxes are not an issue. It took removal, hard cleaning, and foil taping from the outside to seal my 2013 cubbies. So for Tundras, this leaves a few seams, gaps, holes and the biggest of them all – the tailgate gaps.
The other gaps and seams are addressed in the other articles in this resource. Here we cover the Toyota Tundra tailgate seal how-to how and where to add seals to limit water and dust entry from the tailgate.
Show Me Your Seals!
I have used ESI Rok, Extang, and TruxSeal tailgate seals and don’t really have a go-to brand or model. I had excellent results with TruxSeal on my Tacoma and so am using that one for this Toyota Tundra Tailgate Seal. The Tundra forums like Tundras.com as well as other truck forums contain the recommendations and experiences of dozens, so you can benefit by their successes and failures.
Any truck tailgate seal you use won’t be effective if it isn’t installed correctly and in the right position. Take the time to read the directions and check out any online videos available. This time will be well spent.
If you have rust or other surface flaws, the seal will not last long. Take care of those problems first, and consider using an adhesion promotor where the surface is not completely smooth and intact.
This goes for spray on bed liners as well. Investigate whether you can apply it outside the sprayed surfaces and still close the gap.


It’s All About The Base
“I am here to tell you,” as they say, that if you don’t have a really clean base surface, the tailgate seal will simply not last. I probably don’t have to tell you how i know this.
On a nice, warm and dry day, gather everything you need so things go well and it all ends with a smile (and maybe a beverage). You will need:
- car soap and brush
- lint free towel to dry with
- grease cleaner such as Krud Kutter
- rubbing alcohol and paper towels
- razor blade
Unpack the seal and lay it out to warm a little in the sun while you prepare the surfaces.
Start by washing all surfaces of the truck bed edge where the seal will be applied, This includes the truck bed sides and the tailgate sides where the two meet when closed. Then use a cleaner like Krud Kutter to make sure all wax and grease is removed, then wash again.
Use the alcohol prep wipes included in the tailgate seal to wipe the areas where the seal will be applied. Clean well around bumpers, electrical entries and other interruptions in the application areas.
PRO TIP: The tailgate seal kits come with alcohol wipes, but i use rubbing alcohol on a folded paper towel to make sure the surface is really clean and dry.

Placement Considerations
Open and close the tailgate while observing where to place the bottom seal for maximum seal.
Once you have an idea, cut a 3″ test piece of the rubber seal from the end with the worse curve (from the packaging). Apply this to the area you have chosen and check by closing the tailgate. Since you cannot block the entire depth of the gap, focus on where the bed surface meets the tailgate inside surface. Again, time spent with this test piece will pay off.
In the case of a spray-on liner, you will stick the adhesive part of the rubber seal to the.clean metal just below the liner.

tailgate seal adhesive area

Nice…
Do not cut the tailgate seal, yet. Peel back about 6 inches of the covering, exposing the adhesive. Start at one end with the tip snug against the side of the bed and the adhesive just below the spray-on liner. Take your time, peeling back just enough to let you position the seal. Do not stretch the seal as you go.
When you reach the other end, carefully cut the tailgate seal with your razor blade or cutter so that the end is again snug against the side. Complete the lower seal by firmly pressing the adhesive part to the truck bed surface.
The picture to the left shows the lower seal in.place. Notice that the seal extrusion overlaps the spray-on liner. This is the best placement for the seal, while allowing the adhesive part to stick to the clean painted surface just below the extrusion and liner.

Side Seals
Open and close the tailgate again to make sure you chose a good placement to close as much of the side gaps as possible. Decide where the best place to cut this strip at the top.We will discuss a gap that may remain near the top.
Orient the tailgate seal extrusion so that it is over the end of the spray-on liner and the adhesive is over the painted metal, similar to the lower seal placement. Start at the bottom, peel back some of the adhesive cover, and butt this rubber seal strip against the lower seal. Apply along the chosen placement, carefully cutting around any bumpers or other obstacles. The goal is to leave no gap in these areas as well.
PRO TIP: Use weatherstrip adhesive or a sealant such as Sika to ‘weld’ the side strip end to the lower strip. Any gap here will let dust in!

Cut around tailgate rubber bumper

Side seal positioning

Close Gate – Open Eyes
There are likely a few more places we need to seal. The best way to find them is to close the tailgate and camper shell door, cover the side and front windows or somehow limit the light from outside, and search the edges for light coming in. Light coming in equals moisture and dust coming in.
We mentioned one of these gaps earlier. The picture below shows the gap left near the top of the side seals. This can be addressed using the leftover tailgate seal. Determine the best placement, then install these pieces in the gaps (you have previously prepared the tailgate side surfaces – right?).


Truck Cab to Camper Shell “Seal”
While many may not need to seal between the cab and camper shell, I had a need to seal at least the top and sides against rain while camped or driving. Despite my plea to the camper company, the install leaked at the front enough to douse pillows and bedding everytime there was any measurable rain. After failed attempts to seal the infamous ‘bedrail to shell gap’ with flexible RV sealer, I decided I needed to prevent rain from entering the entire space between the truck and camper full window back window. This would – in theory – prevent water from entering through any of several suspect areas. And a bonus would be a method that didnt slowly wear the paint on both surfaces like the old inflatable boots were known to do.
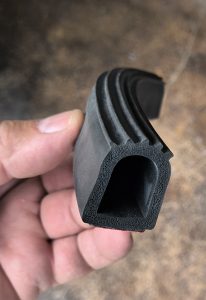
Not finding any reasonable commercially available boots for full gap protection without removing both windows all together, and after trying – lets call them creative – methods like pipe insulaton and pool noodles, I got out the old ‘scraps-and-pieces-of-rubber-seals’ box and started playing. Ahah! I tested a piece of double bulb tailgate seal seated into a D-shaped rubber extrusion made for RV seal replacements. And here is what happened.
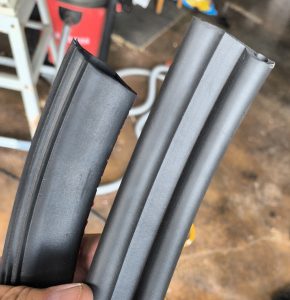 Double bulb trilagte seal |
 D-shaped extruded rubber RV seal |
 Tailgate Seal + D-shaped Extrusion |

View of top seals. Double bulb is attached to the cab (right). D-extrusion attached to the camper shell (left).
Start by dry-testing for fit, then cleaning all surfaces where the adhesive will contact with alcohol THOROUGHLY. The first attached strip was the double bulb tailgate seal. I chose just below the reverse/bed light and above the slider top bar on the truck cab, continuing across the top to angle down the sides about 2 inches. At this point the gap is too tight for both seals to fit down the sides. Both ends were cut at 45 degrees with short side down. Do the final hard press to fix the contact.
Next the d-extrusion was center marked so it would be even down both sides. The backing was cut in the center and a few inches to either side of the reverse light fixture, then it was slid into place inside the double bulb, peeling the backing off once placement was good. This method was used throughout the project.
Once the top area with the double bulb seal was done, I curved the d-extrusion down just inside the cab and camper surfaces for a nice looking finish.
Since neither surface should be sliding against the paint, there should not be any damage from wear on the finishes. Even down the sides, the d-shaped extrusion is hollow so should be able to roll with the motion between camper/bed and truck cab. I will let you know in a few years!
PRO TIP: Make sure there are no high and low areas before pressing the two strips permanently in contact with the surfaces. Also try to mate the highest ridge even with the top surface inside the top bulb of the tailgate seal (see image “Tailgate Seal + D-shaped Extrusion).
MATERIALS:
- 18 ft D Shape Door Rubber Seal Strip,1″ RV Slide Out Seal Self-Adhesive EPDM Rubber
- Extang Maxseal Truck Bed Tailgate Seal 1140

Side view of D-extrusion attached to the camper shell. Recessed in about 1.5 inches gave it a nice clean look.
Toyota Tundra Tailgate Seal how-to: That’s it! Be sure to share your experiences and suggestions in the comments.